
Ness Lake Bible Camp-Archery
Canada Camp Forum :: Skills :: Archery
Page 1 of 1

Ness Lake Bible Camp-Archery
![]() by Hortons Heroes Thu Dec 20, 2007 1:05 pm
by Hortons Heroes Thu Dec 20, 2007 1:05 pm
based off of a % system. Tally their scores at the end of each day and tell them what they are shooting. Keep track on your clip board what each kid is doing so you can track it day by day. Their final rank will be what they got on their best day.
Skill Outlines
Archery-MUST HAVE FIRST AID KIT ON RANGE-LOCK SHED WHEN SHOOTING
Day 1 Archery
Bible Lesson: The definition of sin and how it is also an archery term. Any shot in archery that misses a direct bulls eye is know as a sin. Missing the perfect shot is a sin. Think how many times we all miss Gods perfect mark for us.-“Missing the Mark”. We cannot hit the mark that God has set for us every time, we miss his standards and sin. Jesus never missed the mark once. Jesus makes it so that in Gods eyes we are a perfect shot every time.
Romans 3:23 “For all have sinned and fallen short of the glory of God.”
-Introductions of yourself and the archery area
-Attendance
Sit everyone down so you can go over the rules and technique of archery.
Archery safety and rules
-don’t touch equipment if you have not been instructed to.
-only fire when given the OK by instructor
-arrows must always point within the firing area
-walk to retrieve arrows
-do not walk past an arrow, pick it up and then get the arrows behind it
-point tips at ground when walking arrows back
-the command CEASE FIRE means that you unstring your arrow and put you bow away.
Parts of the bow-Go over these parts of the bow today
NOCKING POINT-
BOW GRIP
ARROW REST
SIGHT
Dominance Test and which hand pulls with which eye
Shooting -Whistle blowing method
-one whistle-pick up bows and go to firing line
-two whistle-touch/load arrows and fire when ready
-three whistle-retrieve arrows (ONLY GIVEN WHEN ALL ARROWS ARE ON THE BOW REST)
Basic stance and aiming-REFERENCE THE LAST PAGES
-aim shoulders at target (stand 90degrees to the target)
-load arrow on arrow rest first then place the knock on the knocking point with the cock feather facing away from the bow.
-pull back hand to cheek or face, always bring hand back to same point
-look down the arrow with one eye and aim the tip
-release with the fingers making sure the hand stays in it’s position on the face.
For their first round of arrows allow them to load an arrow and wait until you have seen them shoot once to ensure that they are firing the odd feather out, finger tips only on string etc. Once you have seen them fire correctly once or twice go to the next person. This method will take a bit of time for the first round but by the second and third rounds you can be sure they are using the proper technique and can start to work on
Once everyone has had a chance to shoot once then stop them and go over some basic technique for aiming.
The key to doing well in archery is to be able to group your arrows in a small area. Then it is just a matter of adjusting your aim to get good scores. Here are some of the most common errors that tend to spread your group out.
Shooting Left (right for lefties)
● Wrong sighting eye
● Not standing straight
● Twisting the bow at release (bad grip)
● Wind
Shooting Right
● Wind
Shooting High
● Nocking arrow low on string
● Overdraw (poorly defined anchor)
● Jerking (plucking) at release (sore fingers?)
● Leaning Back
Shooting Low
● Nocking arrow high on string
● Underdraw (poorly defined anchor)
● Creeping (tiring or bow too heavy)
● String hitting arm guard (bad grip)
1. The “draw” and “anchor point” is critical to shooting well in archery. The archer needs the same amount of power in each arrow otherwise his aiming is of no value. Do the following:
a. Demonstrate the correct draw.
b. Demonstrate the high and low anchor points.
c. What is “creeping”? (Allow the string to move forward from the anchor point before releasing it, often when the archer is tired or the bow is too heavy.)
2. Explain how freestyle aiming is done.
a. What is a “point of aim”? (Location where the tip of arrow is pointing at full draw)
b. What is “point blank range”? (Range where point of aim is the same as target center.)
c. Explain how to use a sight on a bow. (We only have one bow with sights so you can do this very briefly.
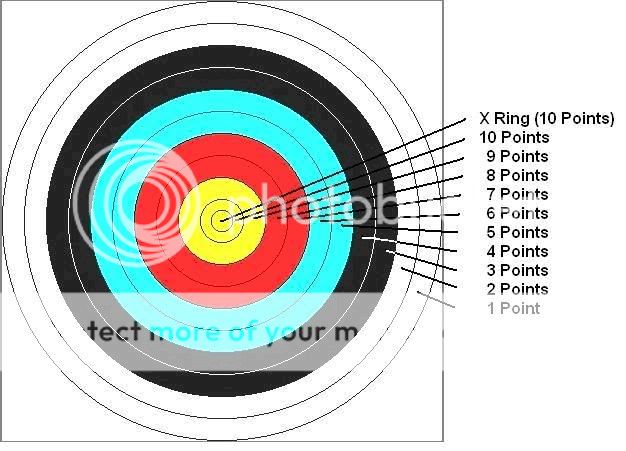
3. Explain the following about 48” standard archery target.
a. What are the values of each color ring? (9-7-5-3-1-0)
b. What happens if the arrow hits a line? (Count higher value)
c. What if an arrow bounces off the target or goes through? (If it is witnessed, it is scored as 7)
d. How are scores called? (Arrows are called individually from the highest to lowest. Include arrows that missed: 9-3-1 or 7-5-0)
1. Demonstrate and discuss the following about arrows:
a. Identify five parts of the arrow (nock, fletching, crest, shaft, pile or tip)
b. What are the common materials arrows are made from? (cedar, fiberglass, aluminum)
c. What is spine? (arrow flexibility)
d. What are “matched arrows”? (Arrows of same weight, length, spine and fletching)
2. Demonstrate and discuss the following about bows:
a. Identify nine parts of the bow (nock, belly or face, lower limb, arrow rest, fistmele, string, serving, back)
b. Demonstrate how to measure fistmele
c. Demonstrate (or explain) the three types of bows. (Long Bow-oldest bow; Recurve Bow-smoother shooting than long bow; Compound Bow-smoothest shooting and most accurate with a low full draw pull)
d. Define the draw weight (pull a full draw on a 28” arrow. Compound bows have an initial draw weight plus a reduced “break over” draw weight at full draw)
• The command Fast means stop shooting immediately and return the unshot arrow to the quiver. It is used when the situation becomes suddenly and unexpectedly dangerous
-attendance
-Review Camp Code-apply it to Archery
Be safe, Be Kind, Be respectful, Honor God
-History and Parts of the Bow and Arrow
You can decide which ones are the most important ones to know.
-arrows
Point scoring-
Points keeping is fairly simple, if an arrow break a line then you get the higher of the two points. USE THE POINTS CARDS PROVIDED.
Day 2
Bible Lesson-stretch out the first days lesson over the four day and work it into a Gospel story through out the week.
(0-15) -Attendance
-Recap of rules and safety-from day 1
Teach these parts of the bow
LIMB
BOW STRING
PIVOT POINT-show an open handed shot, loose in the hands, straighter shot.
Teach these parts of the arrow and their use.
FLETCHING-like wings, stabilize and put a spin on the arrow when it is shot
KNOCK-clips onto the string to guarantee that the arrow receives the full force of the string moving forward.
TIP-makes it stick into your target, for hunting makes the animal bleed so you can track it.
tip- there are many different types of tips for arrows for different task. We are using target tips because they go into and out of the foam with as little damage to the target as possible. Some arrow heads are broad and sharp to cut into objects and stick in….gross
Fletching-Fletching is traditionally made from turkey feathers, but solid plastic vanes are also used. Feathers will typically be 3-6" long, while vanes are often only 1-2". They are attached at the nock (rear) end of the arrow with glue, or, traditionally, some type of string such as silk. The fletching is equally spaced around the shaft with one (the cock) placed such that it is perpendicular to the bow when nocked on the string. Three feathers (two hens plus the cock) is the most common configuration, though four or (very rarely) five are used. The fletching is attached at a slight angle, to introduce a stabilizing spin to the arrow while in flight. Oversized fletching can be used to accentuate drag and thus limit the range of the arrow significantly; these arrows are called flu-flus.
shaft-The material and diameter (and, in the case of aluminum, the thickness of the tube wall) of the arrow contribute to its stiffness, or spine. This must be matched to the draw weight of the bow to ensure accuracy.
The wood arrow is very inexpensive which makes it great for beginners. Because of many differences the pieces of wood used to make arrows, they cannot be closely matched. Because of this your arrow flight may vary from arrow to arrow. Wood arrows are not very durable, and they easily warp. Here are some step-by-step instructions for making your own wood arrows.
Fiberglass arrows are a little more durable than wood arrows, they can also be measured to fit archers of different arm lengths and strengths. Fiberglass arrows of any given size can be manufactured more consistently than wood arrows. However they can break real easy if abused.
Aluminum arrows are made in a variety of different sizes. They are also made with different qualities of aluminum alloy. Bent arrows can always be straightened, and damaged arrow points can easily be replaced, so a good set of arrows can easily be maintained for lasting use. Aluminum arrows can be manufactured so that arrows of a given size meet the same specifications, and, consequently , are more consistent and accurate than wood or fiberglass arrows. Therefore you can always purchase additional arrows at any specific time to match your originals precisely. Although they are more expensive than wood and fiberglass arrows, their consistency and durability make them the arrow of choice.
Aluminum-carbon arrows are made of an aluminum core wrapped with carbon. they are smaller and lighter than aluminum arrows. However, the arrows are extremely expensive and are normally only used by archers shooting long distances outdoors. The Aluminum-carbon arrow is impractical for archers who shoot their arrows in tightly pack groups at a target, which happens quit often when shooting short distances, because the
carbon wrapping when struck by another arrow begins to break
Day 3
Bible Lesson: Continue from Day One, have kids try and explain what Sin is in archery terms and relate it to biblical terms.
(0-15) -Attendance
-Recap rules
-Recap of rules and safety-from day 1
-History of arrows
History and types of bows
-long bow-longer than re-curve harder to aim
-re-curve-shorter but because of shape make up its power lost in length
-compound-pulleys make it easier to pull back and add poundage. Used more in hunting etc)
(15-60)-shooting-teach proper target shooting and point keeping
-keep track of shooters and points, really stress the points so that kids have something to aspire to.
Have kids help put away equipment.
Day 4
Bible Lesson: How through Jesus we can make a perfect hit on God’s perfect standard.
(0-15) -Attendance
-Recap on Bible Studies
-Recap of rules and safety-from day 1
(15-60)-Shooting
-Continue helping teach better technique
-hand out awards (candy, dollar store toys) for best shooters and shot
Most archery clubs, especially those with large numbers of juniors, occasionally shoot fun variations on target archery. These fun shoots are generally shot at 20 yards and are designed so that it is not always the 'best' archer who wins. The most common of these are listed below
Pontoon-Playing cards are stuck to the target face, face down. Archers shoot 2 arrows, to hit two different playing cards, with the winner being the one with the best hand.
Poker-Playing cards are stuck to the target face, face down. Archers shoot 5 arrows, to hit five different playing cards, with the winner being the one with the best hand.
Pairs-Playing cards are stuck to the target face, face down. Archers shoot 2 arrows, to hit two different playing cards, with the winner being the first archer to hit two cards which make a pair.
Darts-Instead of shooting at a FITA target face, archers shoot at an enlarged dartboard target face, which can be purchased from most archery dealers. Normal dart rules apply, with archers being divided into teams and taking it in turns to shoot at the target. After three arrows have been shot, they are collected and the score recorded.
Four In A Row-Archers shoot at a 4-by-4 board drawn on a large piece of paper and pinned to the target face. They compete head-to-head, shooting in turn, and must try to get arrows in four consecutive squares (vertically/horizontally/diagonally) before their opponent. This can also be done as a team game or a competition between more than 2 archers.
Loosing.
Figure 1
STANDING. Stand naturally and squarely on your two feet; don't try to toe in or out, and at right angles to your mark - your left shoulder toward the target, your bow in your left hand. The arrow is held in your right hand at the nock end, just above the feathers, and between your thumb and first finger. Figure 1.
Figure 2
NOCKING. Which means placing the arrow on the string. Pick up a shaft by the notch, carry it over the string while your bow is in a horizontal position so that it lays on the knuclde of the first finger of the left band. If you look down an arrow, you will see that the three feathers are placed so there is a free space between two of them. This permits the arrow to leave the bow without any feather hitting. The feather that is colored differently than the other two is the cock feather, and it is at right angles to the nock. When the arrow is properly nocked, it is also at right angles to the string. Arrows are shot from the left side of the bow (right banded archers), and they must be at right angles to the bow and string. They must not be tilted either up or down. Figure 2.
Figure 3
The bowstring is drawn or pulled with the first three fingers of the right hand. These three fingers are hooked around the string. The arrow goes between the first and second fingers. The bowstring cuts across the middles of the first phalanges or palm side of the tips of these fingers. With the string in place, as shown on Figure 3, you are ready to draw your bow.
Figure 4
DRAWING. You are standing at right angles to the target, and you are looking at it down your left shoulder and left arm. The draw is accomplished by a simultaneous movement of both arms-the left pushing out and the right pulling toward you and across the upper chest or should ers. You extend your left or bow arm and pull with the three shooting fingers hooked around the string. It is absolutely essential that you always draw the arrow to the head no matter what distance you are shooting, and that you draw the arrow so your right hand always comes to rest under your jaw or on the jaw or cheek, whichever suits your nature best. Figure 4.
Figure 5
HOLDING. After you have completed the draw, hold this position for a few seconds, during which time you get your aim and release the arrow, called "loosing". A common failing with beginners is to have the arrow fall away from the left side of the bow. Only practice in drawing will overcome this fault. Figure 5.
Figure6
LOOSING. Means what it says-you loose or release the arrow and the bowstring propels it. Quickly straighten the three fingers hooked or curled around the bow string. You must learn to snap these three fingers straight at the same time, so that the release is true and smooth. Figure 6.
Skill Outlines
Archery-MUST HAVE FIRST AID KIT ON RANGE-LOCK SHED WHEN SHOOTING
Day 1 Archery
Bible Lesson: The definition of sin and how it is also an archery term. Any shot in archery that misses a direct bulls eye is know as a sin. Missing the perfect shot is a sin. Think how many times we all miss Gods perfect mark for us.-“Missing the Mark”. We cannot hit the mark that God has set for us every time, we miss his standards and sin. Jesus never missed the mark once. Jesus makes it so that in Gods eyes we are a perfect shot every time.
Romans 3:23 “For all have sinned and fallen short of the glory of God.”
-Introductions of yourself and the archery area
-Attendance
Sit everyone down so you can go over the rules and technique of archery.
Archery safety and rules
-don’t touch equipment if you have not been instructed to.
-only fire when given the OK by instructor
-arrows must always point within the firing area
-walk to retrieve arrows
-do not walk past an arrow, pick it up and then get the arrows behind it
-point tips at ground when walking arrows back
-the command CEASE FIRE means that you unstring your arrow and put you bow away.
Parts of the bow-Go over these parts of the bow today
NOCKING POINT-
BOW GRIP
ARROW REST
SIGHT
Dominance Test and which hand pulls with which eye
Shooting -Whistle blowing method
-one whistle-pick up bows and go to firing line
-two whistle-touch/load arrows and fire when ready
-three whistle-retrieve arrows (ONLY GIVEN WHEN ALL ARROWS ARE ON THE BOW REST)
Basic stance and aiming-REFERENCE THE LAST PAGES
-aim shoulders at target (stand 90degrees to the target)
-load arrow on arrow rest first then place the knock on the knocking point with the cock feather facing away from the bow.
-pull back hand to cheek or face, always bring hand back to same point
-look down the arrow with one eye and aim the tip
-release with the fingers making sure the hand stays in it’s position on the face.
For their first round of arrows allow them to load an arrow and wait until you have seen them shoot once to ensure that they are firing the odd feather out, finger tips only on string etc. Once you have seen them fire correctly once or twice go to the next person. This method will take a bit of time for the first round but by the second and third rounds you can be sure they are using the proper technique and can start to work on
Once everyone has had a chance to shoot once then stop them and go over some basic technique for aiming.
The key to doing well in archery is to be able to group your arrows in a small area. Then it is just a matter of adjusting your aim to get good scores. Here are some of the most common errors that tend to spread your group out.
Shooting Left (right for lefties)
● Wrong sighting eye
● Not standing straight
● Twisting the bow at release (bad grip)
● Wind
Shooting Right
● Wind
Shooting High
● Nocking arrow low on string
● Overdraw (poorly defined anchor)
● Jerking (plucking) at release (sore fingers?)
● Leaning Back
Shooting Low
● Nocking arrow high on string
● Underdraw (poorly defined anchor)
● Creeping (tiring or bow too heavy)
● String hitting arm guard (bad grip)
1. The “draw” and “anchor point” is critical to shooting well in archery. The archer needs the same amount of power in each arrow otherwise his aiming is of no value. Do the following:
a. Demonstrate the correct draw.
b. Demonstrate the high and low anchor points.
c. What is “creeping”? (Allow the string to move forward from the anchor point before releasing it, often when the archer is tired or the bow is too heavy.)
2. Explain how freestyle aiming is done.
a. What is a “point of aim”? (Location where the tip of arrow is pointing at full draw)
b. What is “point blank range”? (Range where point of aim is the same as target center.)
c. Explain how to use a sight on a bow. (We only have one bow with sights so you can do this very briefly.
3. Explain the following about 48” standard archery target.
a. What are the values of each color ring? (9-7-5-3-1-0)
b. What happens if the arrow hits a line? (Count higher value)
c. What if an arrow bounces off the target or goes through? (If it is witnessed, it is scored as 7)
d. How are scores called? (Arrows are called individually from the highest to lowest. Include arrows that missed: 9-3-1 or 7-5-0)
1. Demonstrate and discuss the following about arrows:
a. Identify five parts of the arrow (nock, fletching, crest, shaft, pile or tip)
b. What are the common materials arrows are made from? (cedar, fiberglass, aluminum)
c. What is spine? (arrow flexibility)
d. What are “matched arrows”? (Arrows of same weight, length, spine and fletching)
2. Demonstrate and discuss the following about bows:
a. Identify nine parts of the bow (nock, belly or face, lower limb, arrow rest, fistmele, string, serving, back)
b. Demonstrate how to measure fistmele
c. Demonstrate (or explain) the three types of bows. (Long Bow-oldest bow; Recurve Bow-smoother shooting than long bow; Compound Bow-smoothest shooting and most accurate with a low full draw pull)
d. Define the draw weight (pull a full draw on a 28” arrow. Compound bows have an initial draw weight plus a reduced “break over” draw weight at full draw)
• The command Fast means stop shooting immediately and return the unshot arrow to the quiver. It is used when the situation becomes suddenly and unexpectedly dangerous
-attendance
-Review Camp Code-apply it to Archery
Be safe, Be Kind, Be respectful, Honor God
-History and Parts of the Bow and Arrow
You can decide which ones are the most important ones to know.
-arrows
Point scoring-
Points keeping is fairly simple, if an arrow break a line then you get the higher of the two points. USE THE POINTS CARDS PROVIDED.
Day 2
Bible Lesson-stretch out the first days lesson over the four day and work it into a Gospel story through out the week.
(0-15) -Attendance
-Recap of rules and safety-from day 1
Teach these parts of the bow
LIMB
BOW STRING
PIVOT POINT-show an open handed shot, loose in the hands, straighter shot.
Teach these parts of the arrow and their use.
FLETCHING-like wings, stabilize and put a spin on the arrow when it is shot
KNOCK-clips onto the string to guarantee that the arrow receives the full force of the string moving forward.
TIP-makes it stick into your target, for hunting makes the animal bleed so you can track it.
tip- there are many different types of tips for arrows for different task. We are using target tips because they go into and out of the foam with as little damage to the target as possible. Some arrow heads are broad and sharp to cut into objects and stick in….gross
Fletching-Fletching is traditionally made from turkey feathers, but solid plastic vanes are also used. Feathers will typically be 3-6" long, while vanes are often only 1-2". They are attached at the nock (rear) end of the arrow with glue, or, traditionally, some type of string such as silk. The fletching is equally spaced around the shaft with one (the cock) placed such that it is perpendicular to the bow when nocked on the string. Three feathers (two hens plus the cock) is the most common configuration, though four or (very rarely) five are used. The fletching is attached at a slight angle, to introduce a stabilizing spin to the arrow while in flight. Oversized fletching can be used to accentuate drag and thus limit the range of the arrow significantly; these arrows are called flu-flus.
shaft-The material and diameter (and, in the case of aluminum, the thickness of the tube wall) of the arrow contribute to its stiffness, or spine. This must be matched to the draw weight of the bow to ensure accuracy.
The wood arrow is very inexpensive which makes it great for beginners. Because of many differences the pieces of wood used to make arrows, they cannot be closely matched. Because of this your arrow flight may vary from arrow to arrow. Wood arrows are not very durable, and they easily warp. Here are some step-by-step instructions for making your own wood arrows.
Fiberglass arrows are a little more durable than wood arrows, they can also be measured to fit archers of different arm lengths and strengths. Fiberglass arrows of any given size can be manufactured more consistently than wood arrows. However they can break real easy if abused.
Aluminum arrows are made in a variety of different sizes. They are also made with different qualities of aluminum alloy. Bent arrows can always be straightened, and damaged arrow points can easily be replaced, so a good set of arrows can easily be maintained for lasting use. Aluminum arrows can be manufactured so that arrows of a given size meet the same specifications, and, consequently , are more consistent and accurate than wood or fiberglass arrows. Therefore you can always purchase additional arrows at any specific time to match your originals precisely. Although they are more expensive than wood and fiberglass arrows, their consistency and durability make them the arrow of choice.
Aluminum-carbon arrows are made of an aluminum core wrapped with carbon. they are smaller and lighter than aluminum arrows. However, the arrows are extremely expensive and are normally only used by archers shooting long distances outdoors. The Aluminum-carbon arrow is impractical for archers who shoot their arrows in tightly pack groups at a target, which happens quit often when shooting short distances, because the
carbon wrapping when struck by another arrow begins to break
Day 3
Bible Lesson: Continue from Day One, have kids try and explain what Sin is in archery terms and relate it to biblical terms.
(0-15) -Attendance
-Recap rules
-Recap of rules and safety-from day 1
-History of arrows
History and types of bows
-long bow-longer than re-curve harder to aim
-re-curve-shorter but because of shape make up its power lost in length
-compound-pulleys make it easier to pull back and add poundage. Used more in hunting etc)
(15-60)-shooting-teach proper target shooting and point keeping
-keep track of shooters and points, really stress the points so that kids have something to aspire to.
Have kids help put away equipment.
Day 4
Bible Lesson: How through Jesus we can make a perfect hit on God’s perfect standard.
(0-15) -Attendance
-Recap on Bible Studies
-Recap of rules and safety-from day 1
(15-60)-Shooting
-Continue helping teach better technique
-hand out awards (candy, dollar store toys) for best shooters and shot
Most archery clubs, especially those with large numbers of juniors, occasionally shoot fun variations on target archery. These fun shoots are generally shot at 20 yards and are designed so that it is not always the 'best' archer who wins. The most common of these are listed below
Pontoon-Playing cards are stuck to the target face, face down. Archers shoot 2 arrows, to hit two different playing cards, with the winner being the one with the best hand.
Poker-Playing cards are stuck to the target face, face down. Archers shoot 5 arrows, to hit five different playing cards, with the winner being the one with the best hand.
Pairs-Playing cards are stuck to the target face, face down. Archers shoot 2 arrows, to hit two different playing cards, with the winner being the first archer to hit two cards which make a pair.
Darts-Instead of shooting at a FITA target face, archers shoot at an enlarged dartboard target face, which can be purchased from most archery dealers. Normal dart rules apply, with archers being divided into teams and taking it in turns to shoot at the target. After three arrows have been shot, they are collected and the score recorded.
Four In A Row-Archers shoot at a 4-by-4 board drawn on a large piece of paper and pinned to the target face. They compete head-to-head, shooting in turn, and must try to get arrows in four consecutive squares (vertically/horizontally/diagonally) before their opponent. This can also be done as a team game or a competition between more than 2 archers.
Loosing.
Figure 1
STANDING. Stand naturally and squarely on your two feet; don't try to toe in or out, and at right angles to your mark - your left shoulder toward the target, your bow in your left hand. The arrow is held in your right hand at the nock end, just above the feathers, and between your thumb and first finger. Figure 1.
Figure 2
NOCKING. Which means placing the arrow on the string. Pick up a shaft by the notch, carry it over the string while your bow is in a horizontal position so that it lays on the knuclde of the first finger of the left band. If you look down an arrow, you will see that the three feathers are placed so there is a free space between two of them. This permits the arrow to leave the bow without any feather hitting. The feather that is colored differently than the other two is the cock feather, and it is at right angles to the nock. When the arrow is properly nocked, it is also at right angles to the string. Arrows are shot from the left side of the bow (right banded archers), and they must be at right angles to the bow and string. They must not be tilted either up or down. Figure 2.
Figure 3
The bowstring is drawn or pulled with the first three fingers of the right hand. These three fingers are hooked around the string. The arrow goes between the first and second fingers. The bowstring cuts across the middles of the first phalanges or palm side of the tips of these fingers. With the string in place, as shown on Figure 3, you are ready to draw your bow.
Figure 4
DRAWING. You are standing at right angles to the target, and you are looking at it down your left shoulder and left arm. The draw is accomplished by a simultaneous movement of both arms-the left pushing out and the right pulling toward you and across the upper chest or should ers. You extend your left or bow arm and pull with the three shooting fingers hooked around the string. It is absolutely essential that you always draw the arrow to the head no matter what distance you are shooting, and that you draw the arrow so your right hand always comes to rest under your jaw or on the jaw or cheek, whichever suits your nature best. Figure 4.
Figure 5
HOLDING. After you have completed the draw, hold this position for a few seconds, during which time you get your aim and release the arrow, called "loosing". A common failing with beginners is to have the arrow fall away from the left side of the bow. Only practice in drawing will overcome this fault. Figure 5.
Figure6
LOOSING. Means what it says-you loose or release the arrow and the bowstring propels it. Quickly straighten the three fingers hooked or curled around the bow string. You must learn to snap these three fingers straight at the same time, so that the release is true and smooth. Figure 6.

Hortons Heroes- Number of posts : 130
Organization Name : Ness Lake Bible Camp
Postion : Program Director
Name : Dave Horton
Registration date : 2007-12-20 -

Hortons Heroes- Number of posts : 130
Organization Name : Ness Lake Bible Camp
Postion : Program Director
Name : Dave Horton
Registration date : 2007-12-20 -
» Bible Smugglers-Ness Lake Bible Camp
» Ness Lake Bible Camp-Maintenance
» Ness Lake Bible Camp-Scavenger Hunt
» Ooter and Dooter-Ness Lake Bible Camp
» Ness Lake Bible Camp-Army men rules
» Ness Lake Bible Camp-Maintenance
» Ness Lake Bible Camp-Scavenger Hunt
» Ooter and Dooter-Ness Lake Bible Camp
» Ness Lake Bible Camp-Army men rules
Canada Camp Forum :: Skills :: Archery
Page 1 of 1
Permissions in this forum:
You cannot reply to topics in this forum